

WooCommerce Integration

WooCommerce Plugin Setup Guide
Follow these comprehensive steps to install and configure the official eAWB WooCommerce plugin. Seamlessly integrate eAWB's shipping services directly into your WooCommerce store and automate your entire shipping process.
Video Tutorial
Watch this step-by-step video guide to help you through the integration process
Access the Official eAWB WooCommerce Plugin
Install the plugin from WordPress Plugin Directory
Visit the WordPress Plugin Directory to install the official eAWB WooCommerce plugin. Our plugin is specifically designed for seamless WooCommerce integration with all Romanian carriers.
📱 View eAWB WooCommerce Plugin
Access Plugin Installation
Navigate to WordPress plugin management
In your WordPress admin dashboard, click on Module (Plugins) in the left sidebar, then click on Adaugă modul (Add Plugin) to access the plugin installation area.
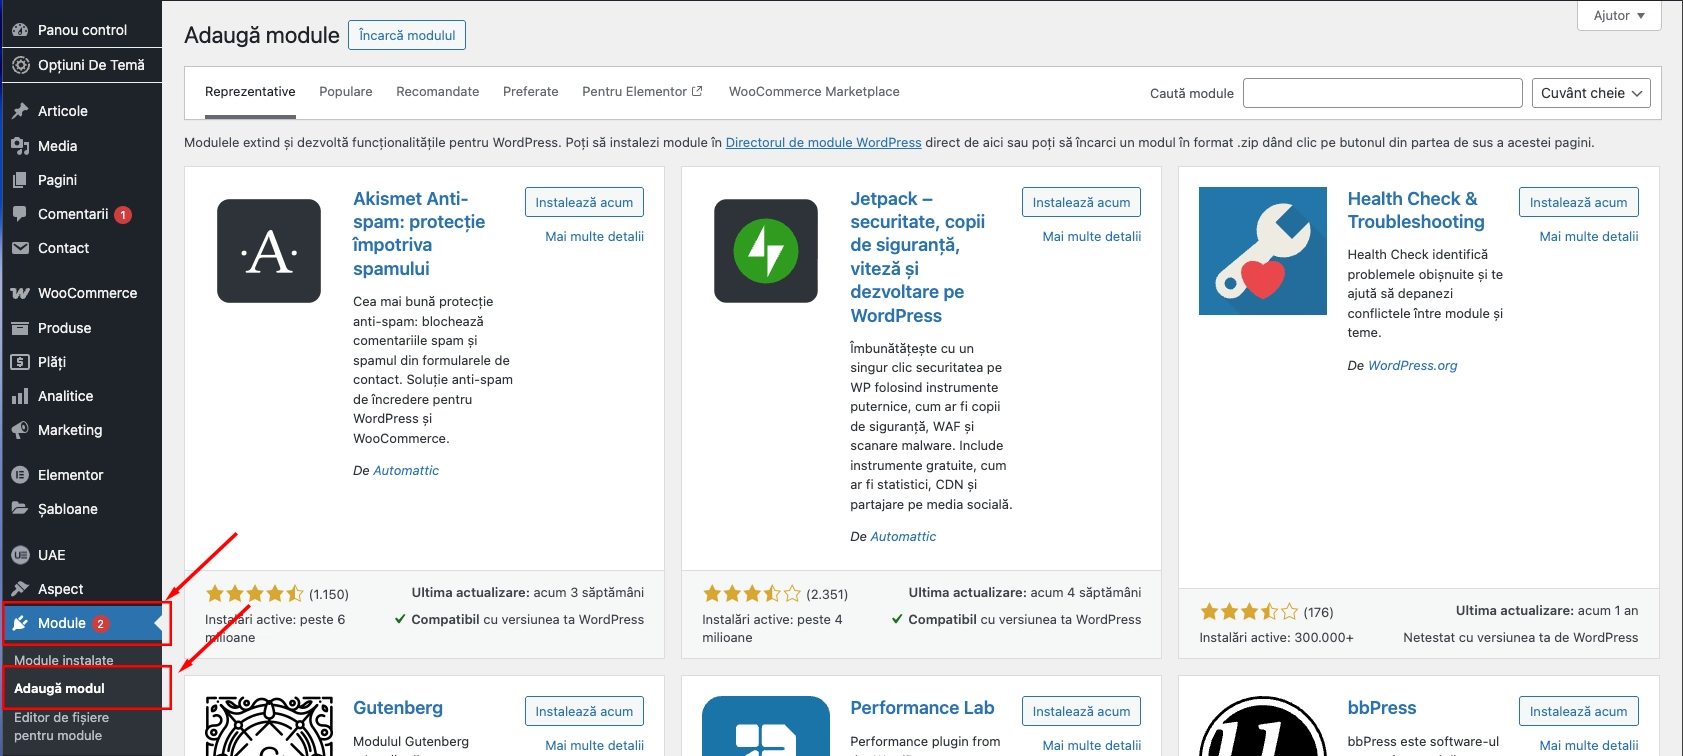
Navigate to Add Plugin section
Important
Make sure you have administrator privileges to install plugins on your WordPress/WooCommerce site.
Search and Install the Plugin
Find and install eAWB from the plugin directory
In the search box, type europarcel to find the official plugin. Once you see Europarcel Integration for Woocommerce in the results, click Instalează acum (Install Now) to install the plugin.
Type europarcel in the search box
Find Europarcel Integration for Woocommerce in the results
Click Instalează acum (Install Now)
Wait for the installation to complete
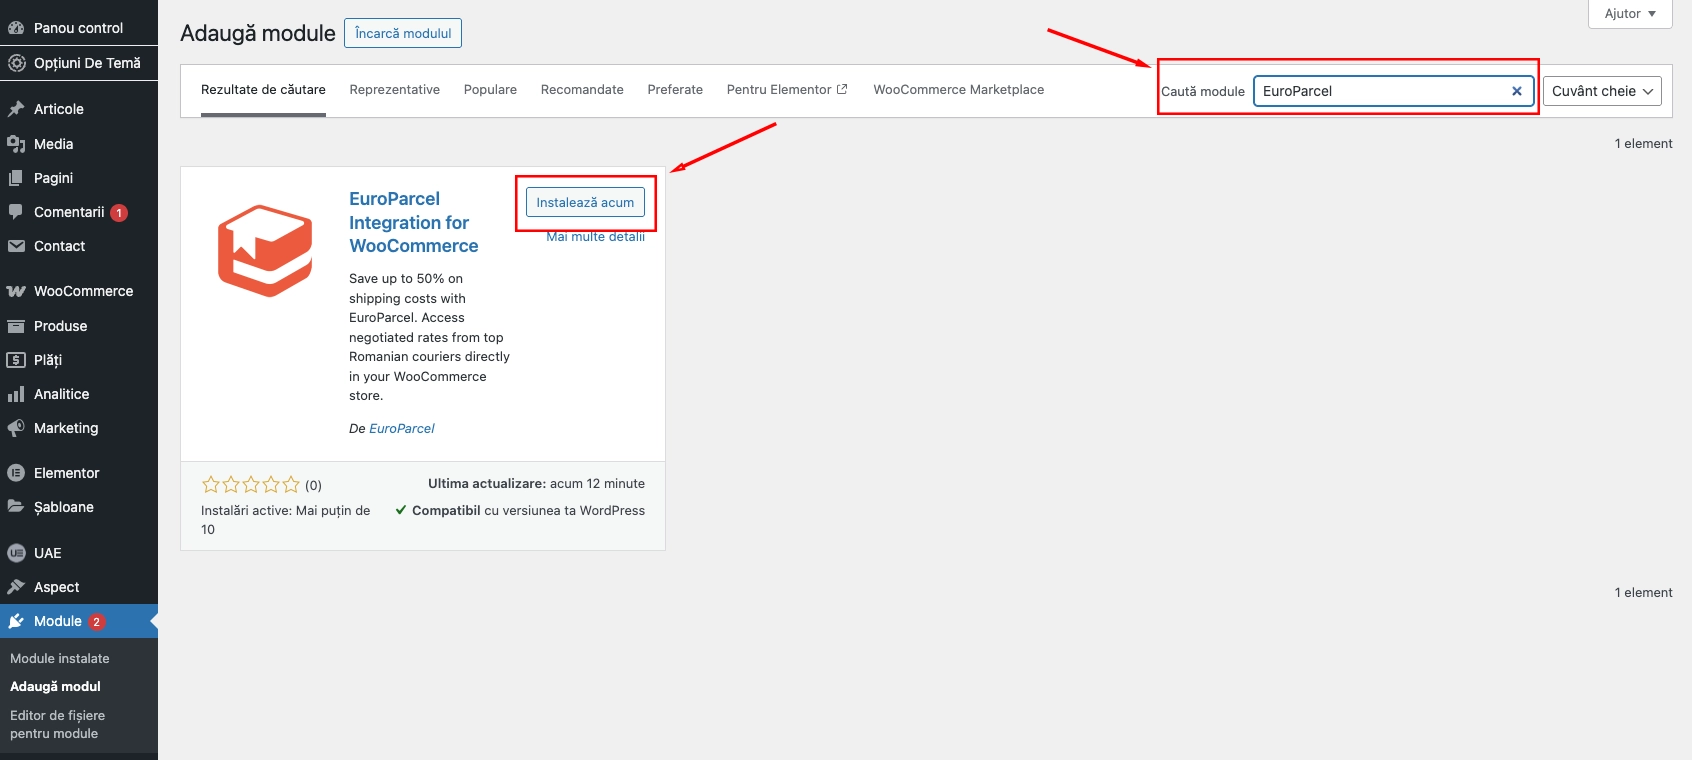
Search for europarcel and install
Activate the Plugin
Enable the eAWB plugin in WordPress
After installation completes, click Activează (Activate) to enable the plugin on your WordPress site.
Click Activează (Activate) after installation completes
Wait for activation confirmation
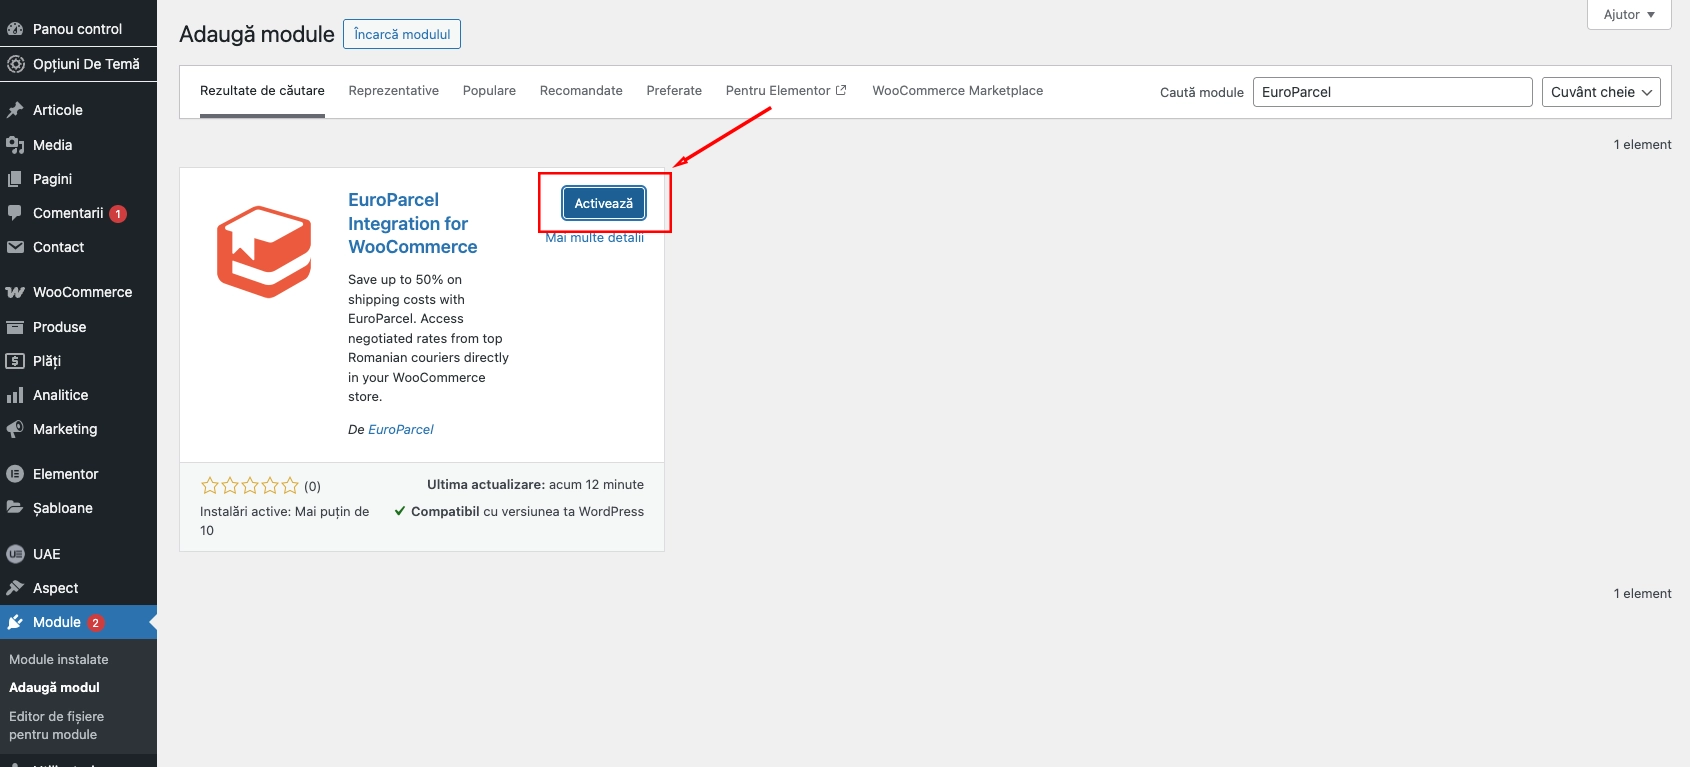
Activate Europarcel Integration plugin
Connect WooCommerce Integration
Access eAWB integrations and connect WooCommerce
Go in your eAWB account, click on the menu Integrări, then go and choose Integrări tab and in available integration click Conectează next to WooCommerce.
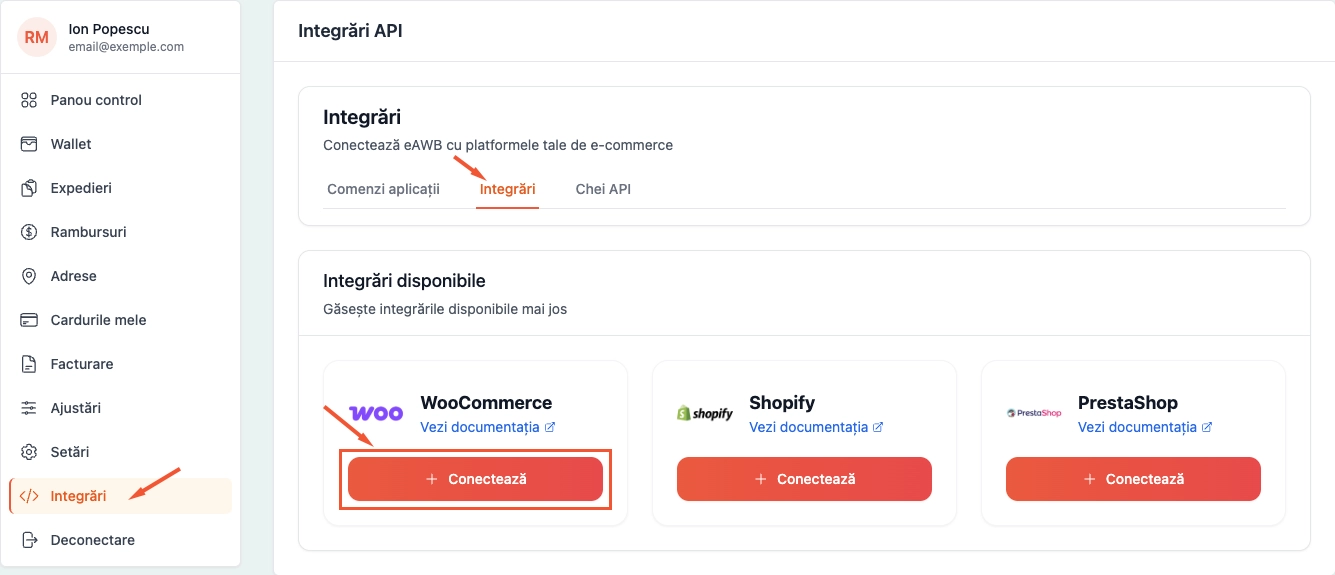
Connect WooCommerce integration
Configure Integration Details
Set up your store connection information
In the modal that appears, fill in the integration details. Add a descriptive name for your integration in Nume integrare and enter your WooCommerce store URL in URL aplicație. Then click Conectează (Connect).
Enter a descriptive name for your integration (e.g., "My Store - WooCommerce")
Add your complete store URL (including https://)
Double-check the URL is correct and accessible
Click Conectează (Connect) to proceed
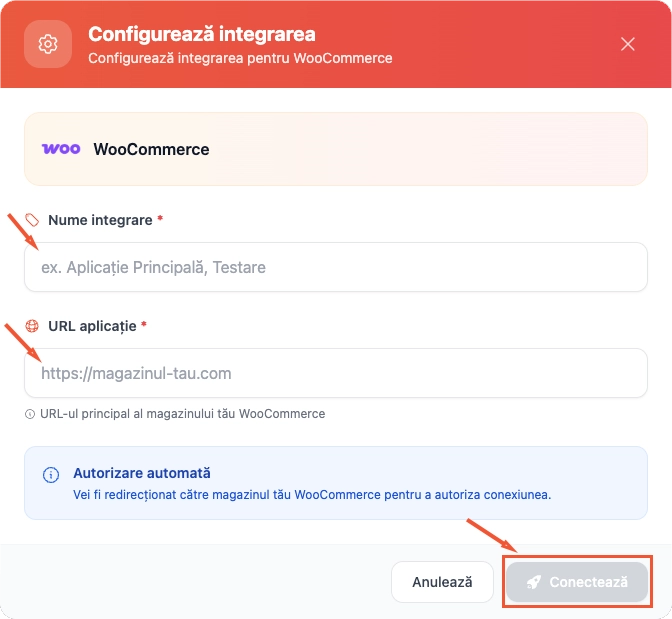
Configure WooCommerce integration details
Important
Make sure your store URL is complete and accessible. This is where eAWB will connect to sync your orders and shipping information.
Approve Integration Authorization
Authorize eAWB to access your WooCommerce store
You will be redirected to your WooCommerce store to approve the integration. This step establishes a secure connection between eAWB and your store. Click Aprobă (Approve) to grant the necessary permissions.
Review the permissions eAWB is requesting
Ensure you're logged in as an administrator on your WooCommerce store
Click Aprobă (Approve) to grant access
Wait for the redirect back to eAWB
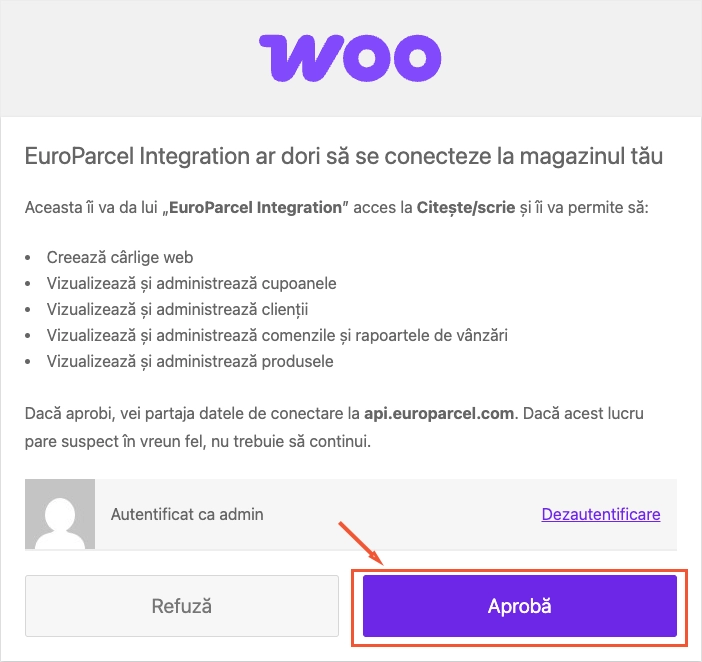
Approve eAWB integration
Important
The integration requires read access to orders, products, and customer information, as well as write access to manage shipping options and order statuses.
Configure Integration Settings
Set up order processing and shipping preferences
Return to the Integrări (Integrations) section in your eAWB dashboard and locate your newly connected WooCommerce integration. Click on Setări (Settings) to configure how orders will be processed.
Navigate back to eAWB.ro → Integrări
Find your WooCommerce integration in the connected list
Click the Setări (Settings) tab
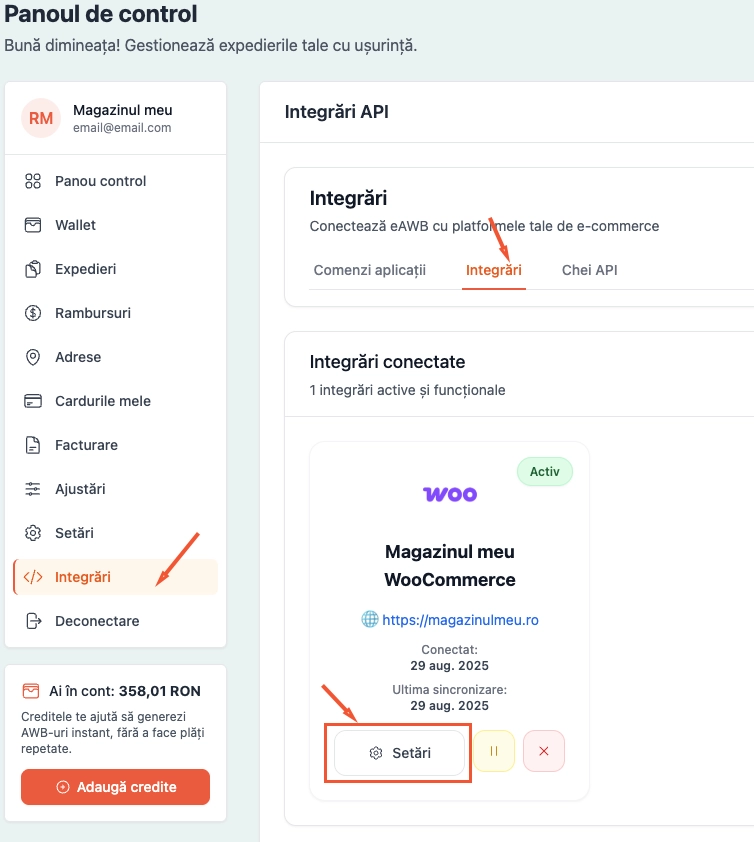
Access integration settings
Set Integration Configuration
Configure shipping and order processing options
In the settings modal, configure your integration preferences by selecting the appropriate options for your store needs.
Select from Serviciu de transport preferat dropdown
Check Statusuri comenzi that you want to import
Choose Status pentru comenzile finalizate
Enable Sincronizare automată if desired
Configure Continut comanda settings
Click Salvează modificările button
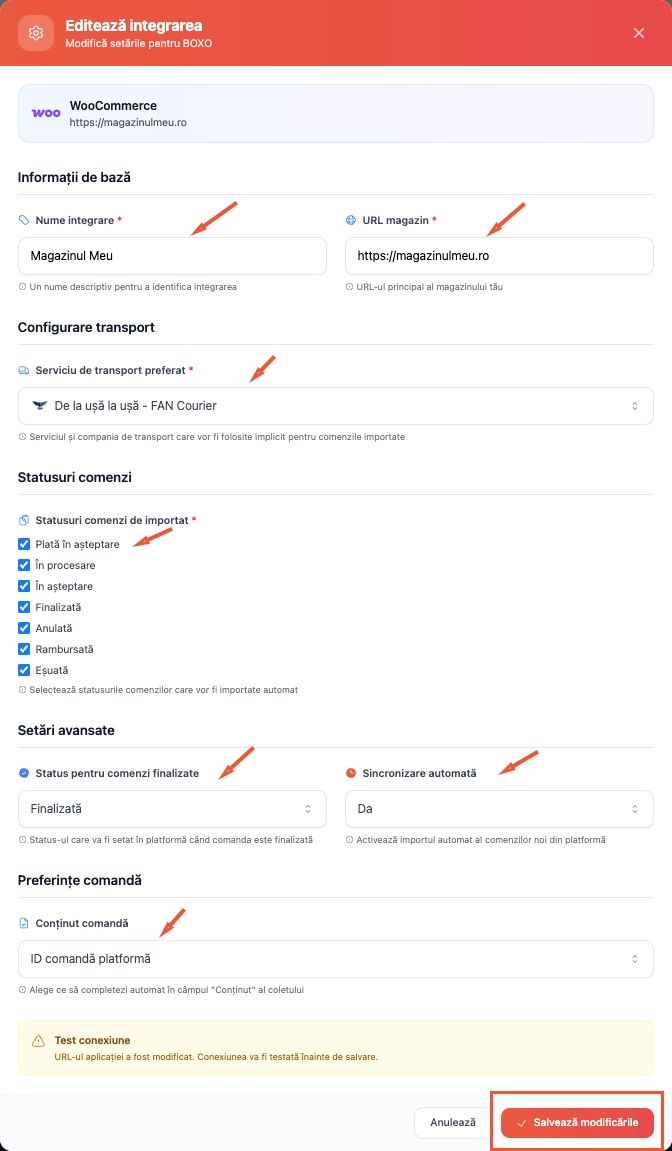
Configure integration settings
Access WooCommerce Shipping Settings
Navigate to your store's shipping configuration
In your WordPress admin dashboard, go to WooCommerce → Setări (Settings) to access your store's core configuration options.
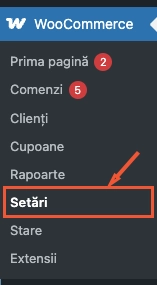
Access WooCommerce settings
Important
Make sure WooCommerce is properly installed and activated before accessing these settings.
Open Shipping Configuration
Access the shipping zones and methods setup
Click on the Livrare (Shipping) tab to access your store's shipping zones, methods, and delivery options configuration.
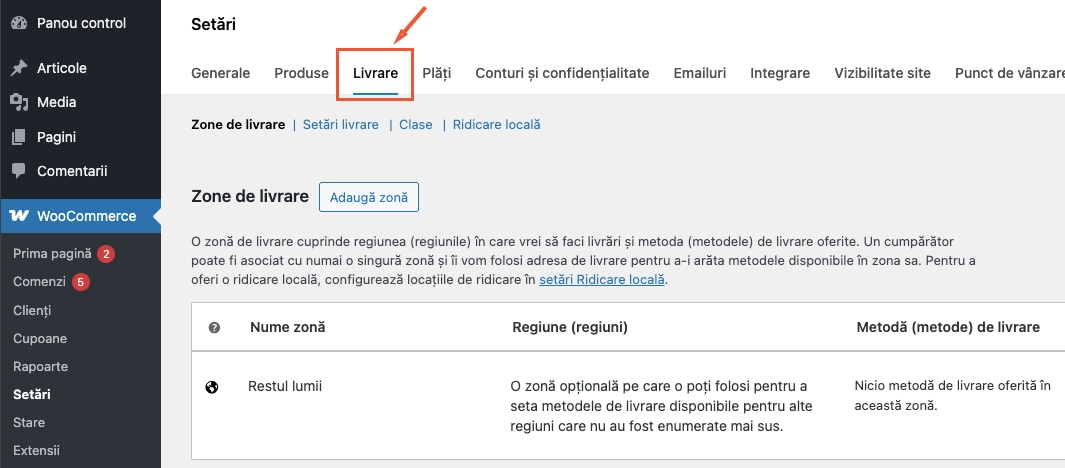
Navigate to shipping settings
Tip
The shipping tab allows you to configure different shipping zones, methods, and pricing for various regions and customer types.
Edit Shipping Zone
Configure the zone where you want to add eAWB shipping
Click Editează (Edit) on the shipping zone where you want to add the eAWB shipping method. This is typically your domestic shipping zone or main delivery area.
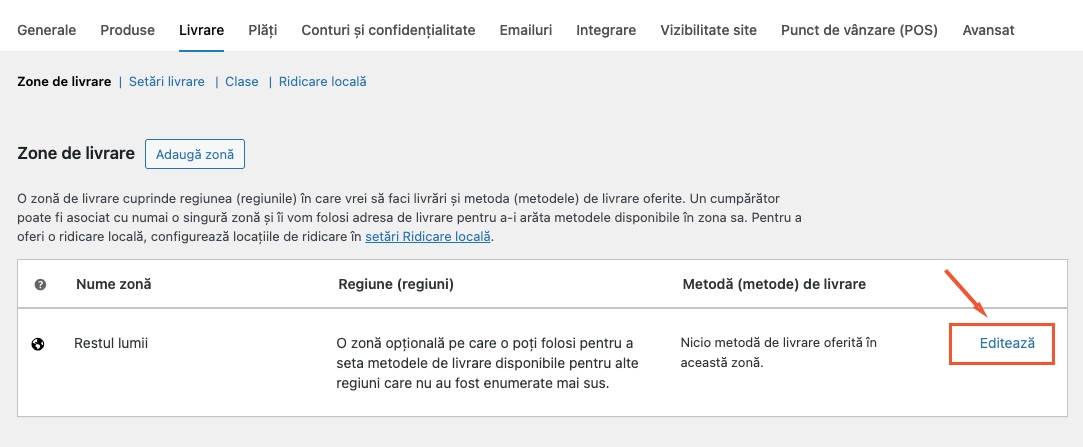
Edit the target shipping zone
Important
You can add eAWB shipping to multiple zones. Most stores start with their primary domestic shipping zone.
Add New Shipping Method
Include eAWB as a shipping option
In the shipping zone configuration, click on Adaugă o metodă de livrare (Add Shipping Method) to include a new shipping option for your customers.
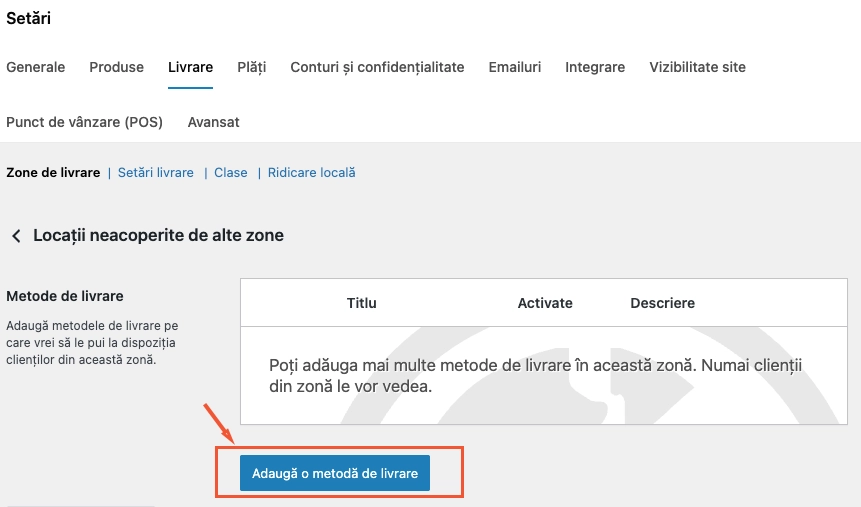
Add new shipping method
Tip
You can have multiple shipping methods in the same zone to give customers different delivery options.
Select EuroParcel Method
Choose the eAWB shipping integration
In the modal that appears, select Transport EuroParcel from the list of available shipping methods, then click Continuă (Continue) to add it to your zone.
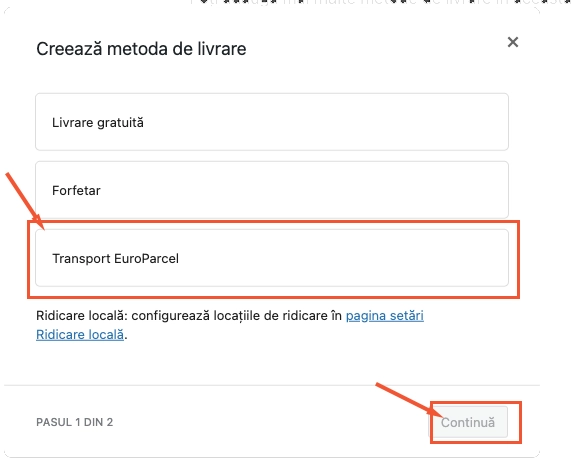
Choose Transport EuroParcel
Important
If you don't see Transport EuroParcel in the list, make sure the eAWB plugin is properly installed and activated.
Configure EuroParcel Settings
Set up the API connection and basic configuration
Click Editează (Edit) next to Transport EuroParcel to open the detailed configuration panel where you'll connect your eAWB API and configure shipping options.
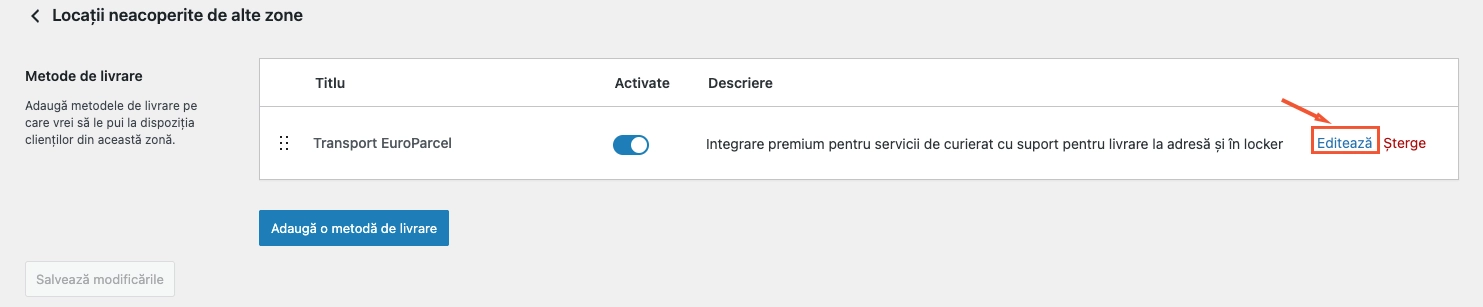
Configure EuroParcel shipping method
Tip
This is where the magic happens - connecting your WooCommerce store directly to your eAWB account for seamless shipping.
Get Your API Key
Connect your eAWB account with secure authentication
Update the Titlul metodei de transport (Method Title) to your preference, then click on Obtine cheia API aici (Get API Key Here) to securely connect with your eAWB account.
Update the method title if desired
Click Obtine cheia API aici (Get API Key Here)
You'll be redirected to eAWB to generate a secure API key
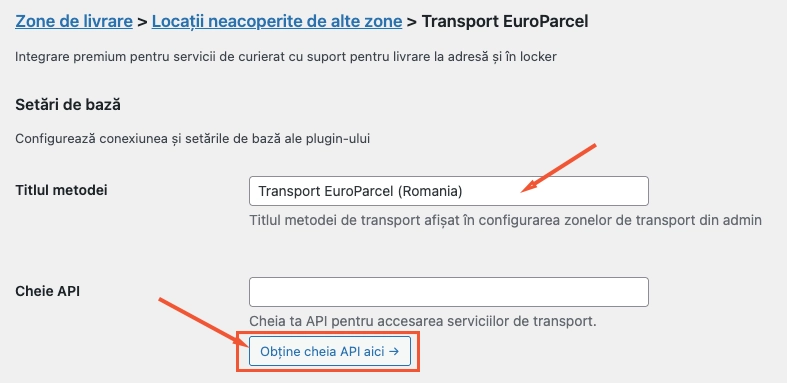
Get API key for eAWB connection
Important
The API key is like a secure password that allows your WooCommerce store to communicate with eAWB services. Keep it safe and never share it publicly.
Copy API Key from eAWB
Copy your API key for WooCommerce integration
In your eAWB account, go to Integrări tab, then Chei API and click the copy icon to copy your API key.
Navigate to Integrări tab
Click on Chei API section
Find your API key in the list
Click the copy icon to copy the API key
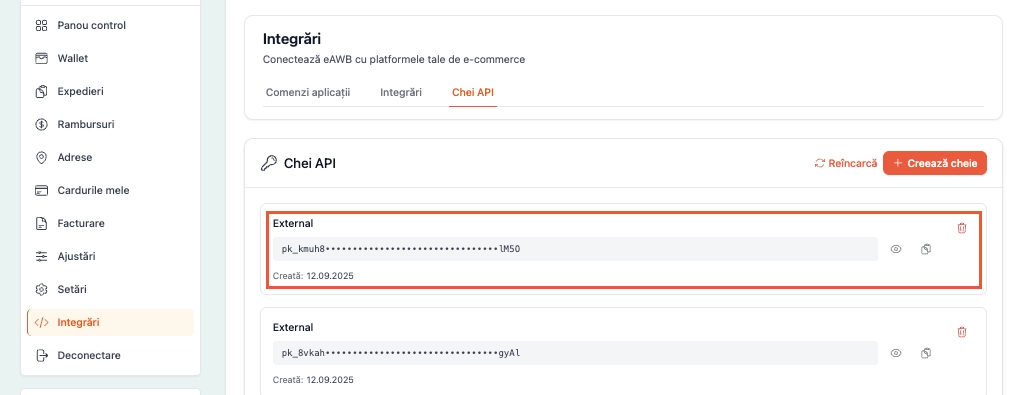
Copy API key from eAWB dashboard
Configure API Connection
Complete the secure connection setup
Return to your WooCommerce admin and paste the API key into the Cheie API (API Key) field. Click Salvează modificările (Save Changes) to establish the connection.
Return to your WooCommerce admin panel
Paste your API key from eAWB into the API Key field
Click Salvează modificările (Save Changes)
Wait for the connection to be validated
You should see confirmation that the connection is successful
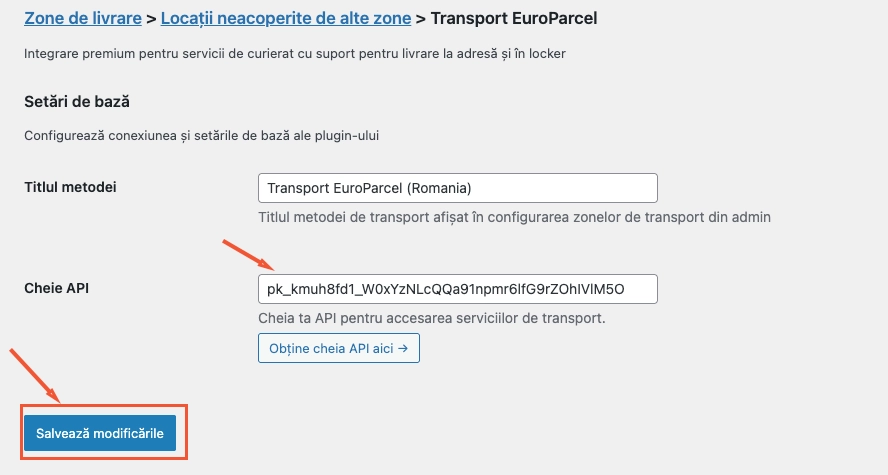
Complete API connection setup
Configure Primary Addresses
Set up your default sender and billing addresses
Select your Adresa principală de expediere (Primary Sender Address) and Adresa principală de facturare (Primary Billing Address) from your eAWB account addresses.
Choose your primary sender address from the dropdown
Select your primary billing address from the available options
These addresses will be used as defaults for all shipments
You can manage these addresses from your eAWB dashboard if needed
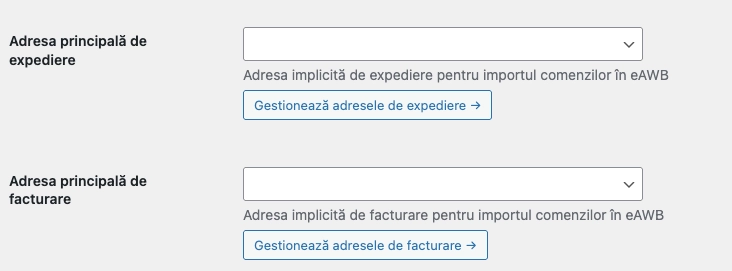
Set up sender and billing addresses
Important
These addresses are pulled directly from your eAWB account. If you need to add or modify addresses, do so in your eAWB dashboard first.
Select Available Services
Choose which shipping services to offer customers
From the Available Shipping Services multiselect, choose which carrier services you want to offer to your customers during checkout. This determines the shipping options visible to buyers.
Hold Ctrl/Cmd to select multiple services
Choose services that match your business model
Consider both standard delivery and locker delivery options
Popular services include home delivery, locker delivery, and express options
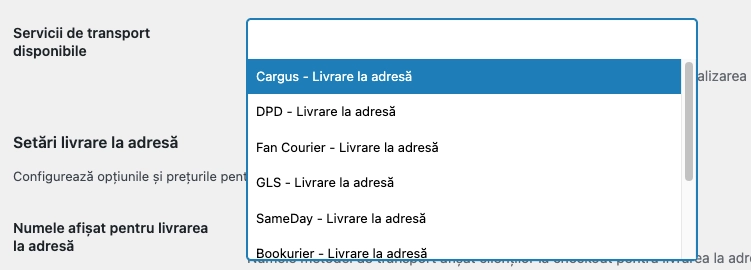
Configure available shipping services
Configure Home Delivery Options
Set up address delivery pricing and rules
Configure your home delivery settings including customer-facing names, pricing, and free shipping rules to create an optimal checkout experience.
Set Home Delivery Display Name (how customers see this option)
Configure Home Delivery Fixed Price (shipping cost)
Set Free Home Delivery Minimum Order Amount (optional)
Choose Free Home Delivery Shipping Classes if applicable
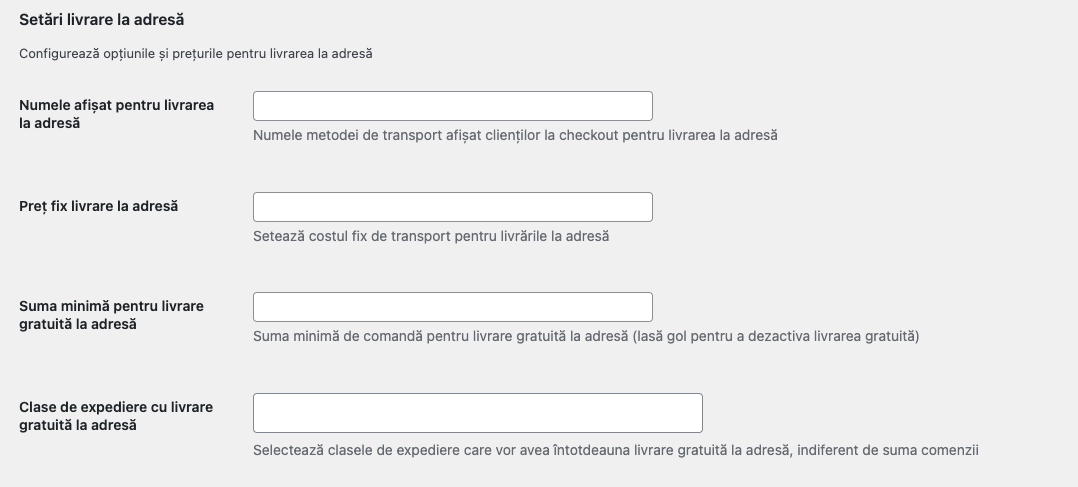
Set up home delivery options
Configure Locker Delivery Options
Set up automated locker delivery services
If you selected locker services, configure the locker delivery options including naming, pricing, free shipping rules, and product exclusions for optimal customer experience.
Set Locker Delivery Display Name for customer-facing text
Configure Locker Delivery Fixed Price
Set Free Locker Delivery Minimum Order Amount if desired
Choose Free Locker Delivery Shipping Classes if applicable
Select Excluded Shipping Classes for Lockers (large items, fragile products, etc.)
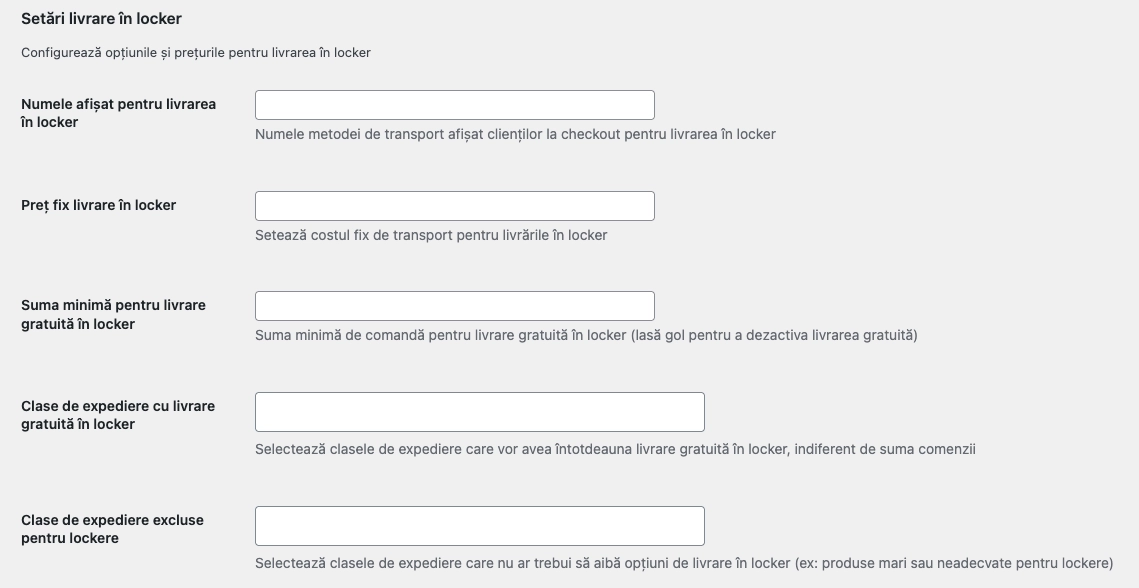
Configure locker delivery settings
Tip
Locker delivery is often more cost-effective and convenient for customers. Consider offering incentives like lower prices or lower free shipping thresholds for locker deliveries.
Save Configuration and Test
Complete setup and verify everything works correctly
Save all your configuration settings and perform a test to ensure the integration is working correctly. Your WooCommerce store is now ready to provide automated eAWB shipping services.
Click Salvează modificările (Save Changes) to save all settings
Go to your store's checkout page as a customer
Add a test product to cart and proceed to checkout
Verify that eAWB shipping options appear correctly
Test both address delivery and locker delivery if enabled
Check that pricing and labels display as configured

Complete the setup process
🎉 Congratulations! Your WooCommerce store is fully integrated with eAWB
You have successfully installed and configured the eAWB WooCommerce plugin. Your customers can now enjoy seamless shipping options, and you can automate your entire fulfillment process directly from your WooCommerce dashboard.